Phantom Manager
The application Phantom Manager is the software that enables a wide range of both operational and system configurations. The main feature of the app is the firmware update of the Phantom devices.
Enter the App Store (iOS) or the Play Store (Android) and search for the “Phantom Manager” app. Download and install it to your phone to use the app. It is important to note that it is necessary to be close to the device to achieve the update. For Phantom devices, the magnetic key will be required.
The capabilities and functions, as well as their step-by-step use, will be briefly described below.
Main Menu
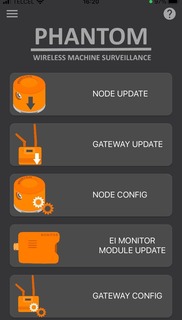
On the home screen we can find 5 main sections:
- Options (top left button)
- Node Update
- Gateway Update
- Node Configuration
- EI Monitor Module Update
- Gateway Config
We’ll describe each section independently
Node Update
Here you can update the firmware version of your Sensors in two very simple ways:
Code Scan
1-Click on Node Update.
2-Scan your QR Code (as shown in the Picture)

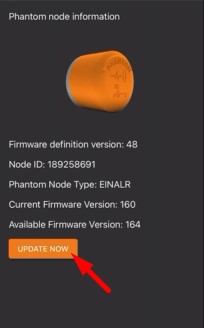
3- Verify your version and click Update Now.
4- Wait for the installation to finish.

* During the update process, the sensor LED will stay on indicating the connection
* Once the update is complete, the sensor will blink rapidly and then turn off, indicating that the update was received successfully.
Select from list
1- Click Node Update and press select from the list

2- Restart your sensor using the magnetic key (As shown in the picture)

3- Find your phantom on the list and press connect. (If is needed restart your sensor again)
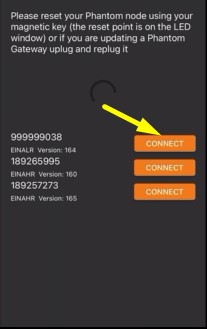
4- Verify your version and click Update Now
5- Wait for the installation to finish**
* During the update process, the sensor LED will stay on indicating the connection
* Once the update is complete, the sensor will blink rapidly and then turn off, indicating that the update was received successfully.
Gateway Update
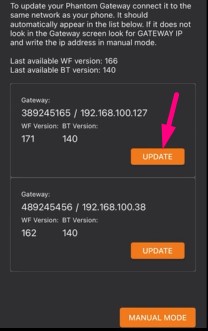
With the Gateway Update option, it is possible to carry out updates for the network and bluetooth drivers of your Gateway device. To achieve this, it is necessary to connect the Gateway to a network, if you don’t know how to do this please visit our Gateway Configuration section. Once you configure the wifi network on the gateway, connect your cellphone to the same network and go to the phantom manager app. Select Gateway Update.
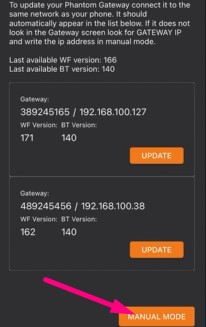
Here you can view the following information:
- Latest version available for Wi-Fi
- Latest version available for Bluetooth
- Gateway ID
- Gateway IP
- Current Wi-Fi version
- Current Bluetooth version
Find your gateway on the list and click Update which will start the update.
At the end we will get the following message: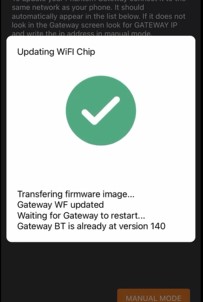
* In case of not obtaining an automatic connection it is possible to carry out a manual update described in the next section.
Manual Mode
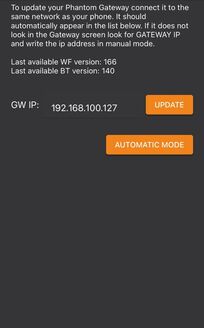
If the Gateway is not found automatically, it is possible to perform a manual search knowing the IP address. To do this, we select the Manual Mode option on the information screen:
which will take us to the following screen where we type the address shown on the Gateway display and click Update:
We wait for the installation to finish, which will show us the following message:
Node Configuration
The Node configuration option allows the user to modify the data collection behavior of Phantom sensors directly from the sensor. To access this configuration it is necessary to click on the Node Configuration Option and scan your phantom QR code or select the phantom from the list just like you did on Node Update section.
Once connected you will access the following Menu:
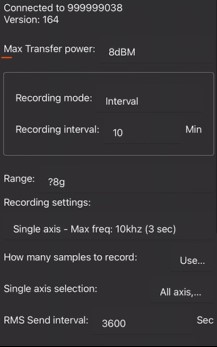
Next, we will describe in detail the use and operation of each subsection of this configuration.
Max Transfer Power
Power of the transmisión signal of the phantom. (Recommended to set at 8dBM)

Recording Mode
With this option, you can configure the sensor data collection process with two possible alternatives:
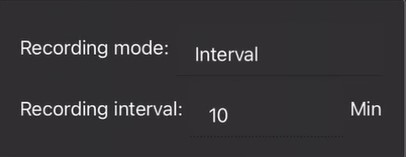 |  |
- Interval: Stablish the Interval for data recording using time in minutes. f.e. Take data every 360 minutes (6 hours). Min 10 minutes and max 2880 minutes.
- Time of the day: It establishes an hour (or hours) for the sensor measurement, allowing to control the machine’s operating and rest times. Select Add to create a new schedule or Remove to delete it.
Measurement settings
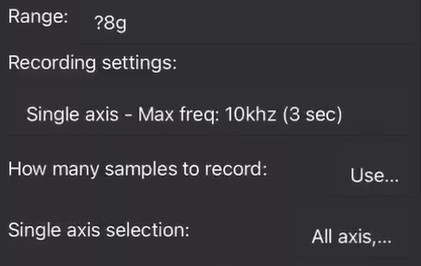
- Range: Sets the sensitivity of the sensor with options of ± 8g, ± 16g and ± 32g for the High-Frequency Sensor; and ± 2g, ± 4g, and ± 8g for the Low-Frequency Sensor.
- Recording settings: This option will allow you to change the sensor measurement time and to select single axis or all axis recording data. Select between 1s, 2s, 4s, 8s, or 16s * The frequency range is altered
- How Many Samples to record: This allows you to choose between using the hole resolution of the phantom or the complete memory of the device for the recording.
- Single Axis Selection: If you choose a single axis on the recording settings, this option will let you choose which axis to send, X, Y, and Z, or to send the all axis sequentially.
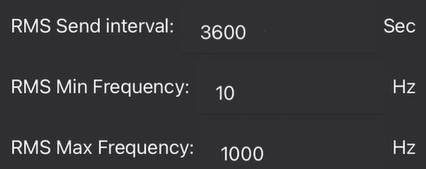
- RMS send interval: The number of seconds that will take the phantom to send his RMS values.
- RMS Min Frequency: The minimum value of frequency on Hz that will be taking into count on the RMS values calculation.
- RMS Max Frequency: The maximum value of frequency on Hz that will be taking into count on the RMS values calculation.
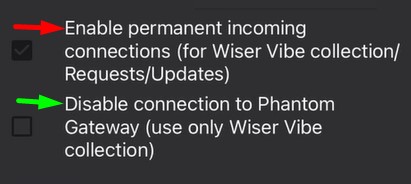
- Enable permanent incoming connections, will allow you to connect to the phantom without restarting it with a magnetic key.
- Disable connection to phantom gateway will turn off the phantom for any gateway around, we will only be able to connect with WiSER Vibe app.
EI Monitor Module Update
To update your Monitor Module it is necessary to connect your cell phone to the same network where the Module is located. Once done, we select the option Monitor Module Update in the application, which will show us the following screen:
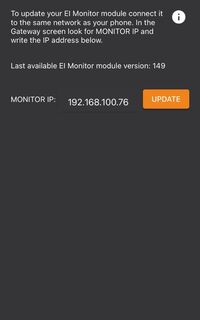
On this screen, we place the IP of our Module which we can find on the Gateway screen with the legend IP Monitor. We click Update and wait for the update to finish.
Gateway Config
Connect the Gateway to a network, if you don’t know how to do this please visit our Gateway Configuration section. Once you configure the wifi network on the gateway, connect your cellphone to the same network and go to the phantom manager app. Select Gateway config.
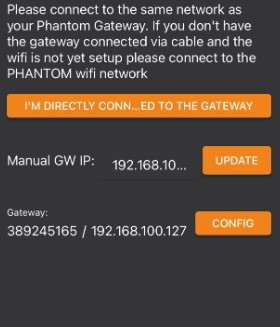
Find your gateway serial number and IP on the list and select Config. We see the following screen:
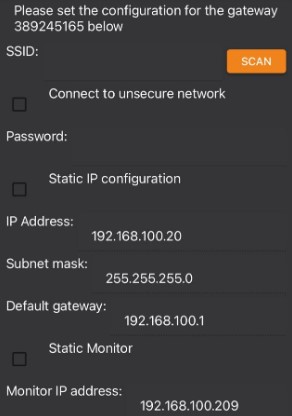
- Wireless connection: To select a WiFi connection you need to do the following:
- Choose between the options in SSID
- Type the password of the selected WiFi Network
- Click on Save Settings
- IP Settings: Some companies require Wi-Fi device connection via static IP. Consult a local network administrator for the required addresses to Static IP configuration. To configure the Gateway this way you need to fill these fields. Example:
- IP address: 192.168.100.34
- Subnet mask: 255.255.255.0
- Default gateway: 192.168.100.1
- Monitor configuration: In most cases, the EI Monitor IP address will be detected automatically as long as both the Phantom Gateway and EI Monitor are in the same subnet. If the EI Monitor IP address is not detected automatically (because it’s in a different subnet) you can mark the “Static Monitor configuration” checkbox and enter the EI Monitor IP address in the “Monitor IP Address” field.
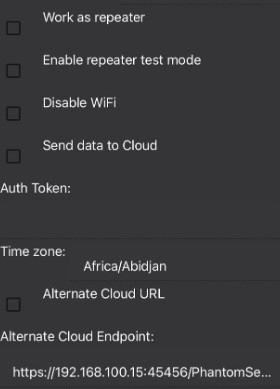
- Work as a repeater: Connect to another Phantom Gateway that is already connected to either WiFi or Ethernet.
- Disable Wifi: Avoids the Wifi connection.
- Send data to cloud: Send data directly to cloud services like EI-Analytic.
- Time Zone: Select your time zone on the list.
- Alternate cloud services: Send data to different cloud services. If nothing is changed here the endpoint is EI-Analytic cloud services.
If you want to know how to configure your Gateway with a web browser visit our Gateway Configuration section.
Beta Firmware
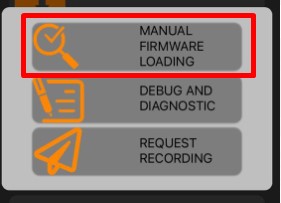
If you are an authorized Erbessd Instruments dealer, you may have early access to trial firmware. Erbessd Instruments reserves the selection of those who will have access to these test programs. Select the menu in the upper left part of the phantom manager app where you will find two options.
Select the Manual Firmware Loading option.
that will direct you to the next screen and enter the Firmware ID code on the indicated line. Click Download to download:
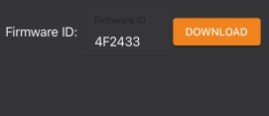
Note: All Firmware ID codes are supplied by Erbessd Instruments Technical Support and these codes are unique for each type of Phantom. Installing unsupported software can damage your device.
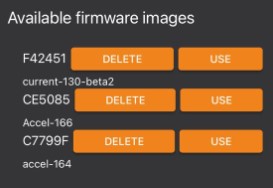
In “Available firmware images”, select the image of the code to install and select “Use”:
At this point you should be close to the device. Select “Scan” on your phone and immediately reset the sensor with the magnetic key. Select the device that requires updating and select “Update”:
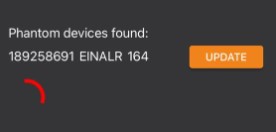
The app will notify you when your device is updated with the legend “Update succeded”.
To know more about our phantom system visit our Condition Monitoring Sensor section.