Learn how to create the connection between Phantom sensors and the most powerful gateway.
If you have not yet configured your Gateway 2.0 to send data anywhere; find two tutorials, which will help you to connect the gateway to EI-Analytic or EI-Monitoring.
Pair Phantom Sensors With Gateway 2.0
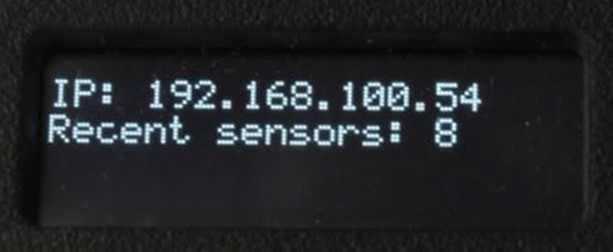
When your gateway is already connected to a network it will show an IP address on the main screen.
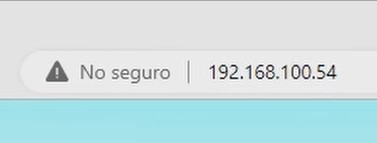
Connect your computer to the same network as the gateway, and go to a web browser, type the IP address in the search bar and press enter, this will load the gateway settings page.
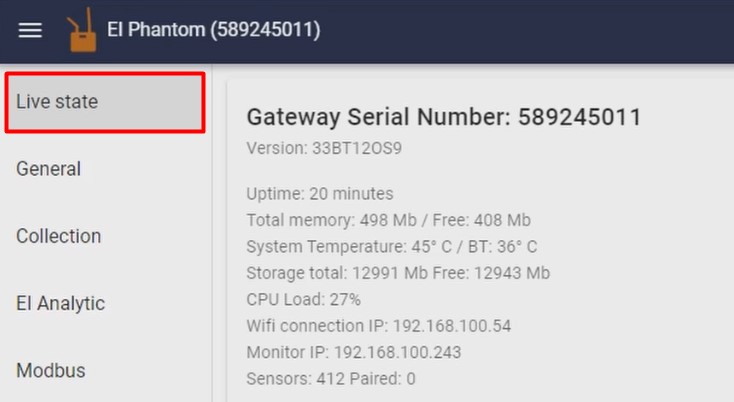
In the “Live STATE” tab we will see the device general status, with its serial number. In this section we must pair our sensors with our receiver, this is very important as the Phantom sensors will not automatically connect to the gateway if we don’t do this.
Under “Search” you can manually enter a Phantom serial number or part of the number to find the sensor on the list.
You can choose to sort the Phantoms by serial number, last seen, node type, signal strength, battery, and last download.
On the right you can filter the sensors, showing only paired sensors, unpaired sensors, sensors with low battery, low signal, your favorites, secured, and unsecured sensors.
Use any of the options to search for your Phantom.
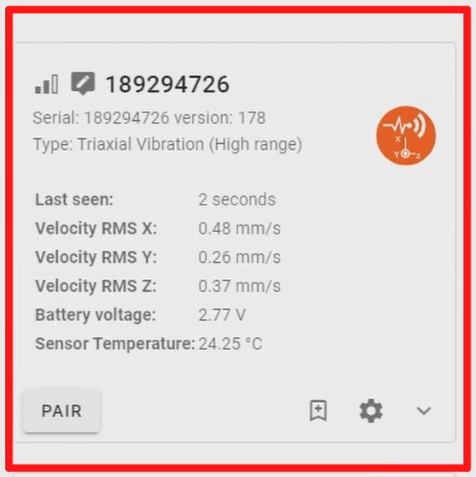
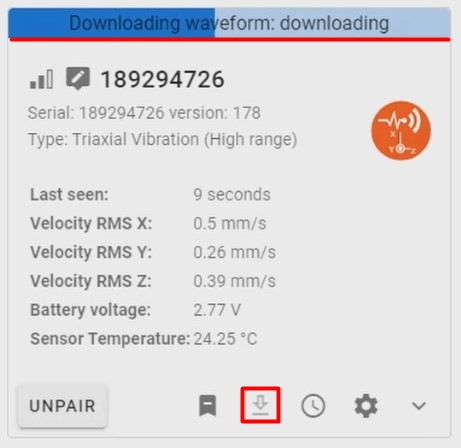
On the screen you will see the status of the sensor with the last date it was seen by the gateway, the RMS value measured on each axis, the battery voltage, and the sensor internal temperature.
Use the “PAIR” button to pair the sensor with your gateway, the same button allows you to unpair it later if you wish. Remember that Phantom sensors will not automatically connect to the gateway if they are not paired.
Sensor Settings
On the screen you will see the status of the sensor with the last date it was seen by the gateway, the RMS value measured on each axis, the battery voltage, and the sensor internal temperature.
Use the “PAIR” button to pair the sensor with your gateway, the same button allows you to unpair it later if you wish. Remember that Phantom sensors will not automatically connect to the gateway if they are not paired.
At the bottom right you will have 5 options.
The 1st option will add the sensor to your FAVORITES
The 2nd option is called “Collect waveform now“, it activates the sensor making it record a time waveform and the FFT, with this tool you can collect data whenever you want.
The 3rd option is called “collection settings“,
Here you will have 4 tools:
In “Timed collection” you will be able to choose the collection mode:
“Follow global collection setting” will make the sensor record data according to the gateway global settings, we will learn how to set this in the 2nd part of the tutorial.
“Interval“, allows you to send data with a defined interval, switch between minutes, hours or days on the right side, and on the left side type the interval of your choice, as long as you stay within the allowed range of the sensor.
“Time of the day“, you can choose specific times of the day to send data. Click on “custom collection time” and select the time with the clock, then click on “ADD TIME” to add it to the list. You can add several hours by repeating this process, and remove hours with the “REMOVE” button.
“Disable timed collection on this sensor” will disable the Phantom automatic collection, it will only record data if you activate it manually with the “Collect waveform now” tool that we saw earlier.
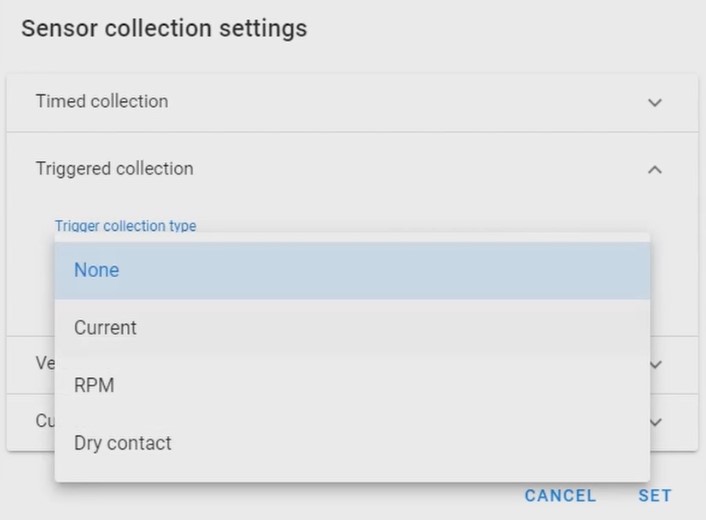
The second section is called *TRIGGERED COLLECTION*, here you can link your vibration sensor with other type of sensors, like current sensors, RPM, and dry contact.
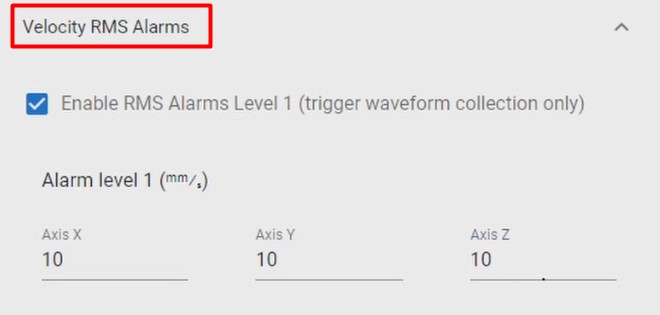
The third section is called “Velocity RMS Alarms“, here you can enable and disable the sensor alarms, you will have two levels of alarms.
The level 1 alarm, will cause the sensor to send the time waveform and FFT if the alarm threshold is exceeded on any of the measured axes, enter the alarm value for each axis.
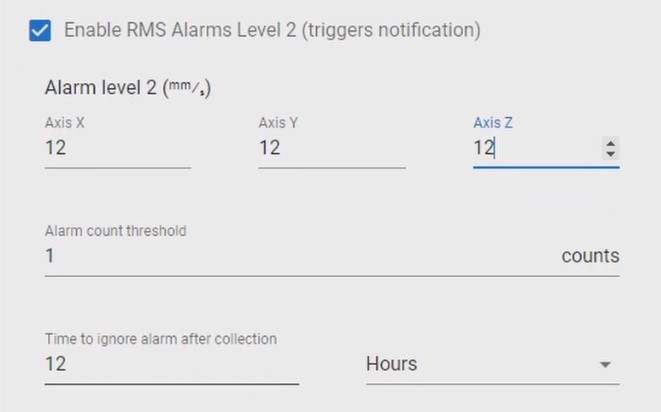
The level 2 alarm, will trigger a notification if the alarm threshold is exceeded, choose the alarm value for each axis.
Below, choose the alarm check interval, this is defined in “COUNTS” or sequences, choose after how many counts the sensor will check if any of the axes are alarmed, you will see how to set each COUNT duration a little later.
Finally, you can tell the sensor how much time must pass before it can be alarmed again, on the right side choose between minutes, hours, and days and on the left side enter the value.
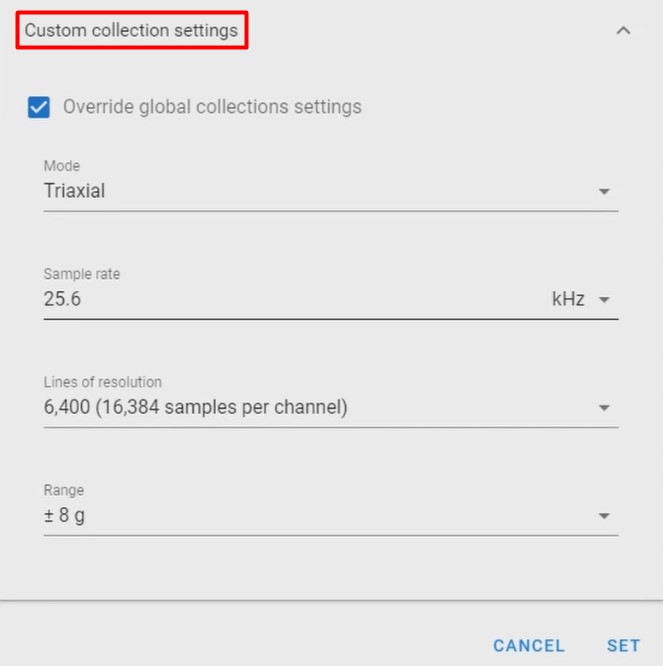
In “Custom collection settings“, by default the sensor will take the gateway global settings, enable the “Override global collections settings” to modify this sensor configurations only. This will display more options
You can choose to record in triaxial or single-axis mode.
In single-axis mode, you can choose which axis to record, or record all 3 axes sequentially.
You can change the sample rate, the resolution lines and the dynamic range, whose options will depend on whether you have a high range or low range sensor.
When you are done with these settings click SET to save the changes.
The 4th option is called “In sensor settings“.
In the *General* section, you can change the max transfer power, which is recommended to keep with 8dbM.
And the “sensor update interval”, this defines after how many seconds the sensor updates its status, this is called sequence or “COUNT”, and this directly affects the alarm check interval as we saw earlier in the video.
Below, you will have the option “Connect to phantom Gateway v1” if you want this sensor to connect to a gateway receiver of the previous version activate this tool, if you also want this sensor to connect to the Gateway 2.0, you must check the “Enable permanent incoming connections” option, otherwise the sensor will not connect to the Gateway 2.0.
If you only want to use this sensor with your Gateway 2.0, keep both options disabled.
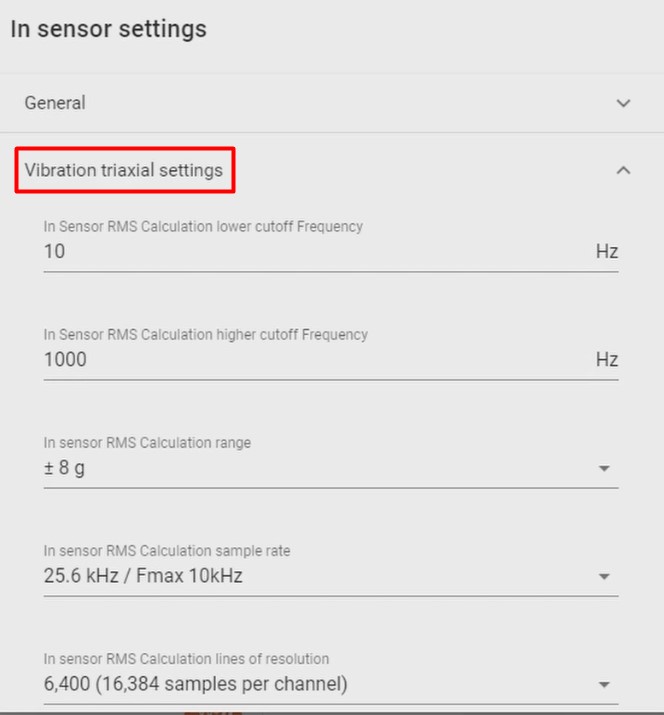
Finally, under “Vibration triaxial settings“.
You will see the frequency range with which the the Phantom sensor RMS values are calculated, according to the standard the range goes from 10 to 1000 Hz by default, but you can modify it if you wish.
You can also choose the dynamic range in which the RMS is calculated, the sample rate and maximum frequency, and the resolution lines.
Click SET when you are done to save your changes.
The 5th option will display more information as well as 3 additional buttons.
On the main screen, it will present:
The last time the sensor downloaded the time waveform and FFT,
The last time it was alarmed,
The last collection by “TRIGGER”,
How many seconds have passed since the last sequence,
The type of battery this sensor uses,
The update interval or time between each sequence,
The max transfer power and the sequence number, meaning the total number of times it has updated its status.
Below you will have 3 buttons, the first one called “FORGET“, it will make the gateway forget the sensor, this way it will remove the Phantom from the list and you will delete the configurations you have made, this is intended for sensors that you no longer use, if the sensor is still transmitting it will appear in the list again although it will not be paired or configured.
With the SLEEP button, the sensor will go into sleep mode, it will not try to connect to the gateway, it will not update its status or check alarms, it will be inactive until it is manually reset with a magnetic key. This will help you to maintain the battery of the sensors that you are not using.
The ADVANCED button will allow you to load specific firmware into your sensor, to avoid damage to your Phantom, do not enter a code without the help of an Erbessd Instruments technical support assistant.
By following these steps your gateway will be able to make a successful connection to your Phantom sensors. If any of these steps are not shown as presented in the tutorial or you have any questions about any part of the process; do not hesitate to contact Erbessd Instruments technical support.