WiSer3x – Quick Start Up Guide
Welcome to the Wiser3x experience, a 3-axis Wireless Accelerometer specially designed for vibration analysis, compatible with any vibration analyzer available on the market. WiSER 3x sends vibration data from 3 axes + 1 additional channel simultaneously. In addition, WiSER 3x is an ultra-low noise wireless accelerometer with a 15 kHz bandwidth that exceeds the characteristics of most conventional accelerometers.
The power button on our WiSer3x is designed to prevent it from being accidentally turned off or on. Press the button once to turn on and 3 seconds to turn off.
Once turned on, our WiSer3x can be detected through the WiFi network of any Apple or Windows device. You can connect to it like any other WiFi signal and its password is: 88888888.
Next we will tell you how to synchronize it with Erbessd Instruments applications.
Digivibe MX 10
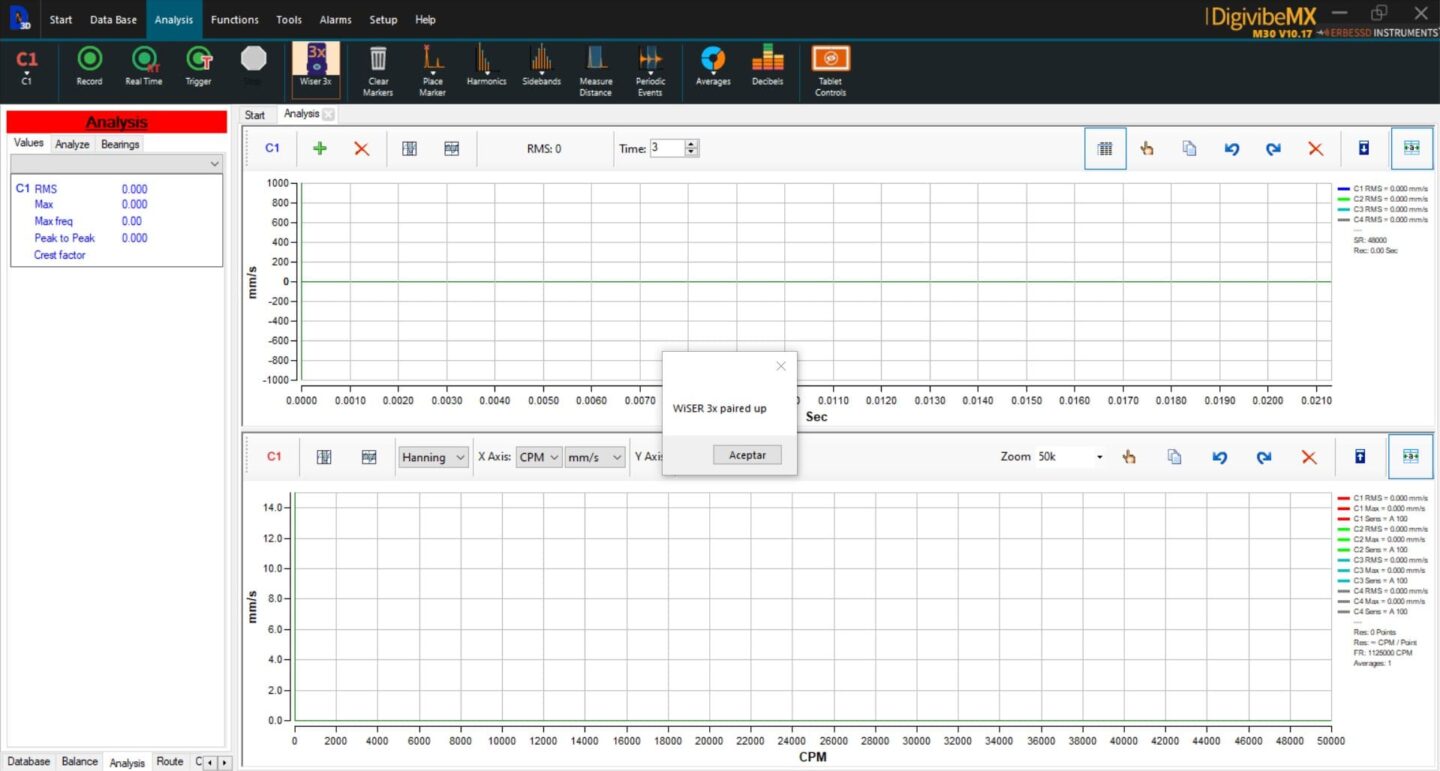
Off-route Analysis in DigivibeMX v10 Software: Open the Analyze menu, select the WiSer3x button. You should receive a “WiSer 3x is paired up” notification. Click Ok. When ready, click record to begin recording.
NOTE: If you do not receive the “WiSer 3x is paired up” notification, ensure the WISer3x has not timed out and turned off. Also ensure that the computer has not disconnected from the WISer3x as its WiFi source.
Route data collection in DigivibeMX v10 Software: Open a New Route. On the Routes menu, select and highlight the WiSer3x Icon. You should receive a “WiSer 3x is paired up” notification. Click Ok. Select A3 to simultaneously 3-axis collect data. Click Axis Configuration to specify the sensor orientation and axis configuration, then click Ok. When ready, click record to begin a triaxial data collection of the first point.
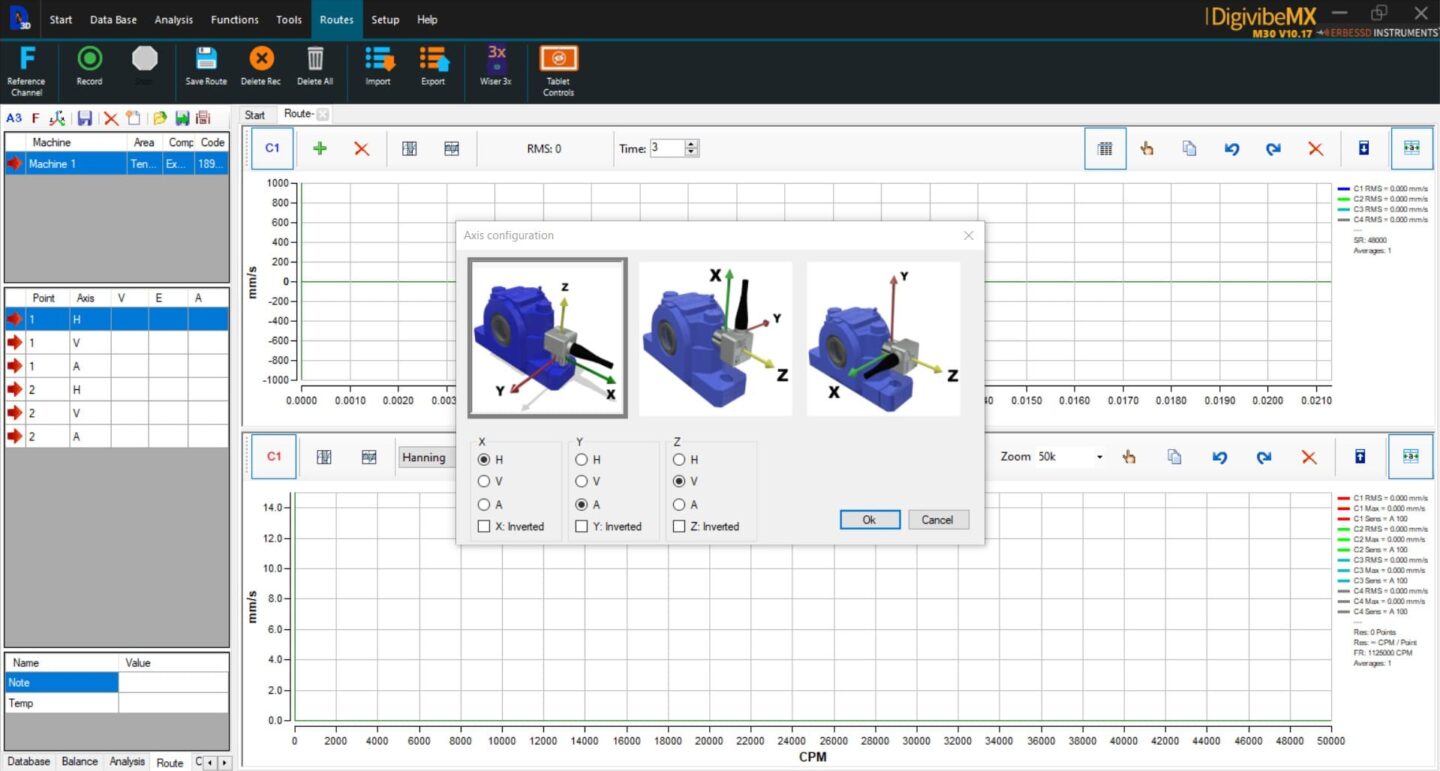
NOTE: The position of the WiSer3x on the machine is very important for the correct measurement of vibration data. For the vertical configuration, make sure that the engraving of the axes is facing you, and for the horizontal case, the engraving should face upwards.
DigivibeMX 11
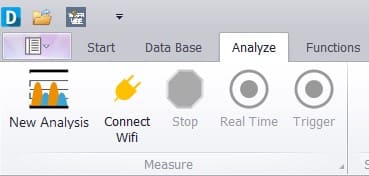
For off-route data collection in DigivibeMX 11 Software: Configure DigivibeMX v11 software to receive data from the WiSER3x interface. On the Configuration Menu, toggle the USB Connection button to WiFi Connection.

Once the configuration has been changed to WiFi we click on the “Analyze“ tab and select the “Connect WiFi” button and when this button disappears our Wiser3x will be completely linked to our computer and the software. You can start a new analysis normally and press the record button to start collecting data.
Route Data Collection in DigivibeMX v11 Software: On the Start menu, select Start Route. Or click the Route tile on the Start screen. Once in the menu select and click on the icon showing 3 Axis. Next, click on the configuration icon to display the Wiser3x position options on the machine. Once the position is selected, click “Ok” and the software is ready to start collecting data.

NOTE: The position of the WiSer3x on the machine is very important for the correct measurement of vibration data. For the vertical configuration, make sure that the engraving of the axes is facing you, and for the horizontal case, the engraving should face upwards.
For Wiser-Vibe
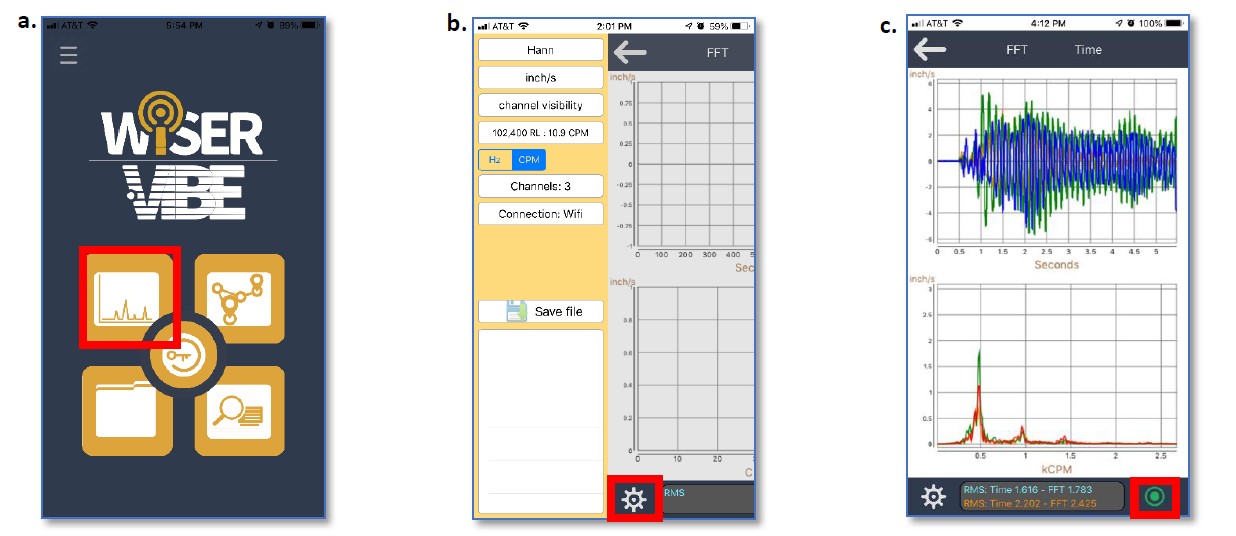
Off-route data collection using the Wiser Vibe app on iOS:
a. Open and select the Analysis box.
b. Configure the setup preferences under Options. To connect follow as described below:
i. Click on connection to switch to WiFi
ii. Close the settings and click on the plug icon.
iii. Re-open the settings and change the Channels to 3 (Image b.)
c. Press the Record button when you are ready to collect data.
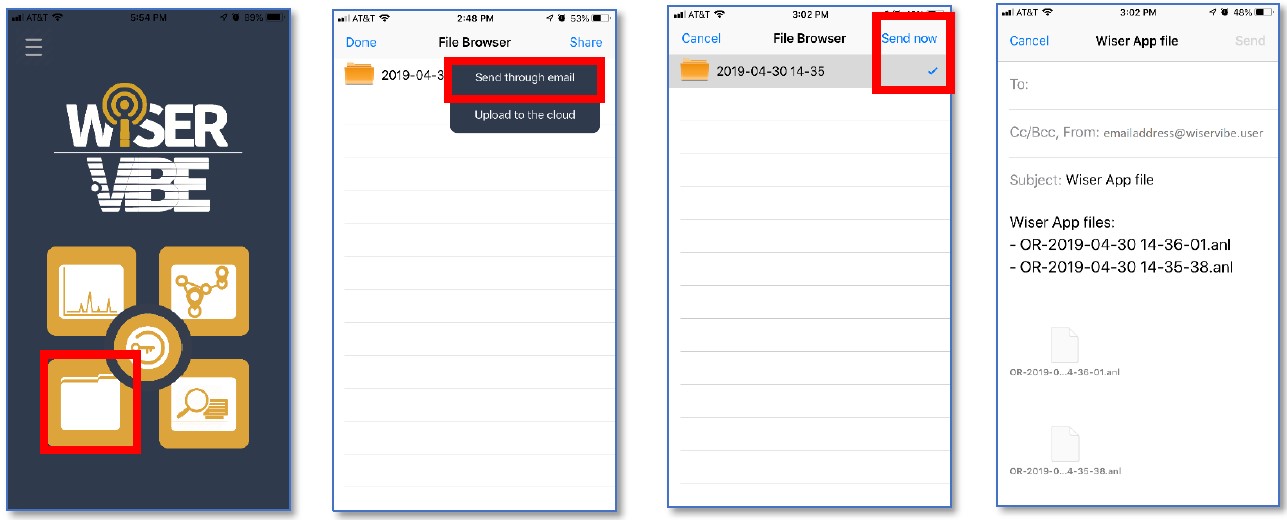
Select “Save File” from the options to save the recording to your iOS device as an .anl file. All files can be viewed by returning to the main screen and selecting the “Files” option. Saved files can be mailed directly from WiSerVibe. Mailed files can be opened with DigivibeMX for analysis.
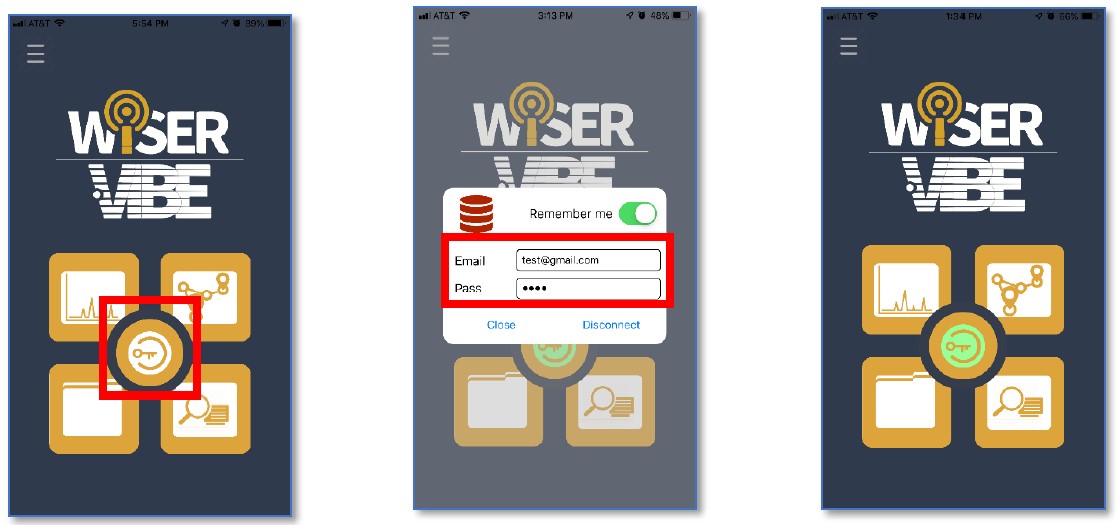
On-route data collection using an EI-Analytics account and the WiSerVibe iOS app:
1. Connect your EI-Analytic account on the main screen (The key is displayed green when connecting).
2. Select the Routes option on the main screen.
3. Click Select Route
4. Open the group where the route is saved and select the desired Route.
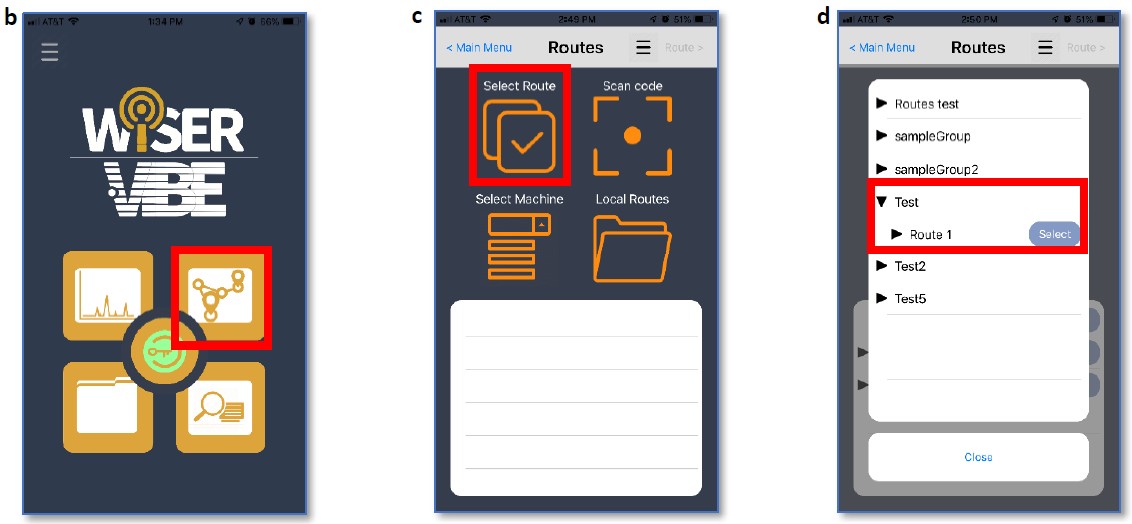
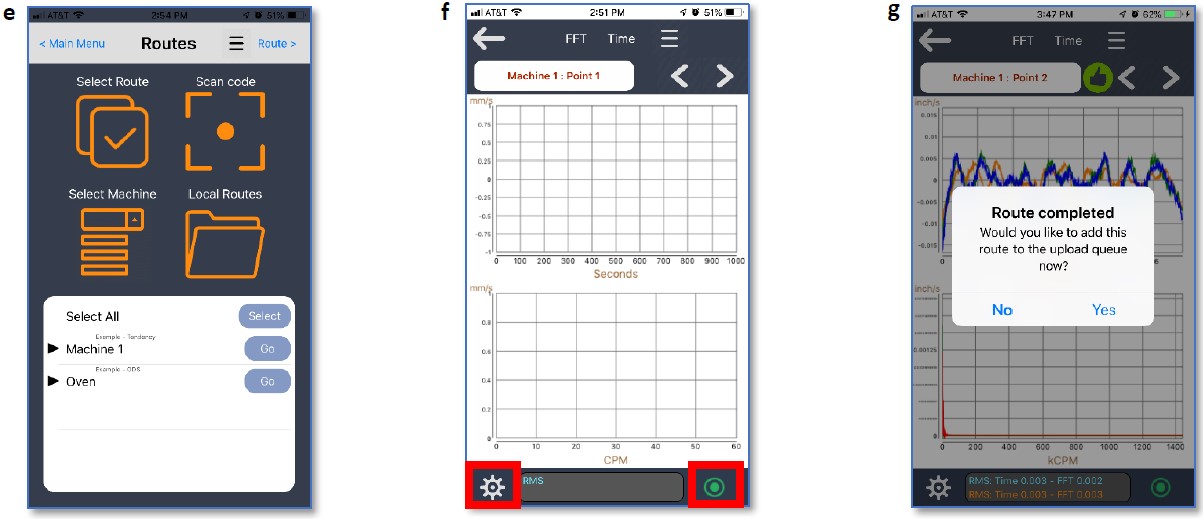
a. You can select individual machines or choose Select All to collect the complete route.
b. . The route opens in the analysis screen to the first point. Place the WISer3x on the machine point to be collected. Open Options to confirm/set the desired collection parameters. Press Record when ready for data collection.
c. After each point is collected, the Analysis screen automatically advances to the next point. When all points along the route have been collected, you will be asked if you wish to save the data to the upload list. Select “Yes”.
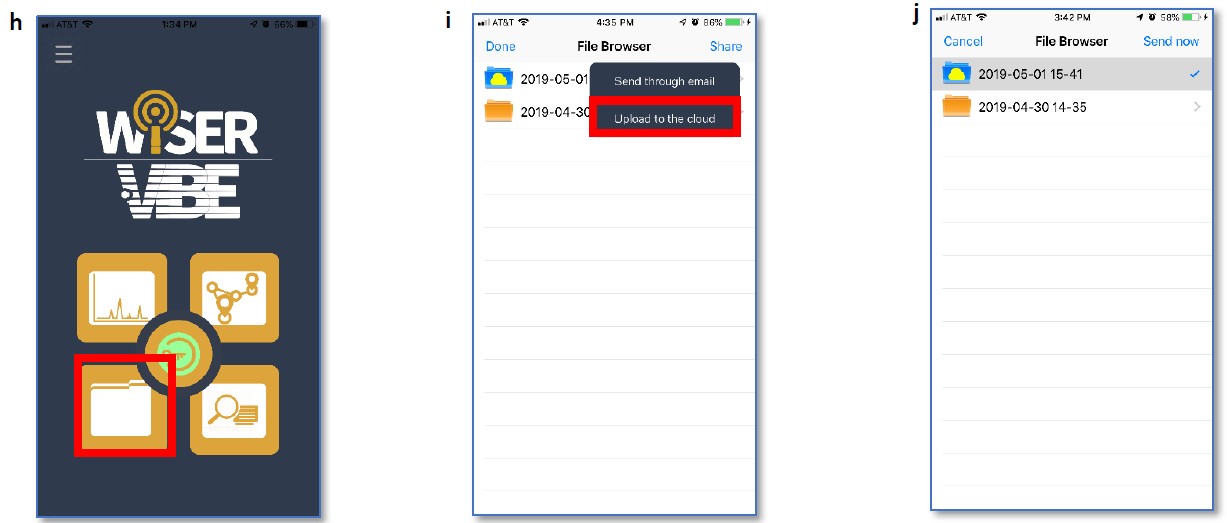
d. Open the Files option in the main screen to view the collected route files.
e. Select Upload to Cloud to send the collected information to the EI-Analytics database.
f. Select the desired destination folder to upload the data and press Submit to complete the transfer to EI-Analytics.
NOTE: The use and connectivity with the EI-Analytic Cloud database will only be functional in the case of having previously contracted the service. The cloud database service is not included in the download of the application, nor in the purchase of the measurement devices.