The PHANTOM® temperature sensor is an amazing way to keep tracking of the heat of your machines and analysis points. For versatility, we have 2 configurations for this PHANTOM®:
Temperature noncontact and Temperature thermocouple.
Here we will show you how to set, attach, and configure these two types, both the physical installation and the Digivibe MX® configuration. If you want to know how to register this PHANTOM® on your database, please visit the manual for the PHANTOM® system setup
Temperature Thermocouple
The temperature thermocouple sensor is the easiest way to analyze the temperature of a fixed point in your machine.
- From -100℃ to 1,250℃
- Interval set time: Minimum 1 minute
- 3.6 V Li-Battery that lasts up to12,000 measurements
- Compatibility with K thermocouple types
- IP67Rating
Our PHANTOM® temperature thermocouple is compatible with Type Ksensors. This kind of sensor is useful to set in very precise locations on your machines, measuring the surface temperaturewith high accuracy and sending information every 1 minute (minimum).
Temperature Noncontact
Our PHANTOM® temperature noncontact (NC) allows you to measure temperature from a good distance for machines that are difficult to reach or with no way to attach the plaque of a thermocouple.
- From -70℃ to 380℃
- Interval set time: Minimum 1 minute
- 3.6 V Li-Battery that lasts up to 100,000 measurements
- Can measure from distances up 6 m
- IP67Rating
As stated in this brief resume of the PHANTOM® temperature sensor (NC) it can measure at ranges up to 6 meters. However, it’s highly recommended to do it as close as 10 cm away from the surface. This way you can ensure the heat received corresponds to the surface and not the ambient surrounding the machine.
Digivibe MX® Configuration
Go to the PHANTOM® window and select Wizard. The PHANTOM® Configuration Wizard screen opens in a new window. Click Add PHANTOM®. Following we need to select one of the next options: Option A allows us to manually enter a PHANTOM® code, and with option B we can scan the PHANTOM® QR code.
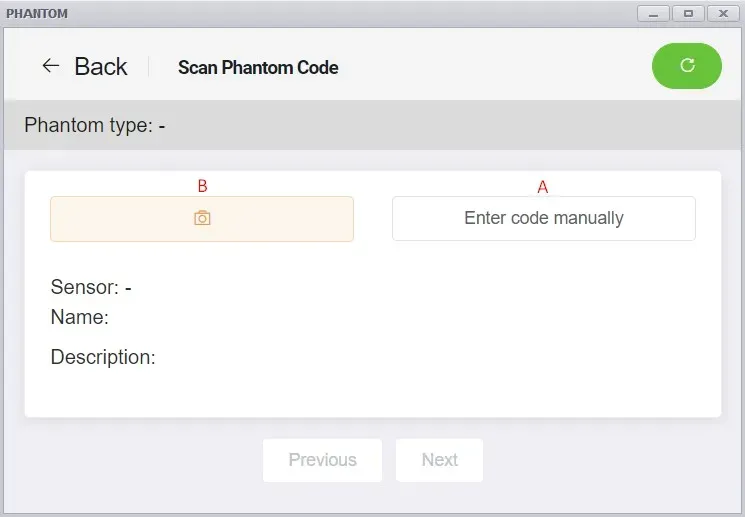
Add PHANTOM® Sensors
Manually
You can add PHANTOM® devices by using an 11-digit ID code, select the Manuallybutton. The Code window opens. Manually enter the 11-digit PHANTOM® ID code from the sensor’s QR label (2-digit sensor model code + 9-digit sensor serial number) into the Code text field. Then click the Ok button. The manually entered sensor will appear in the PHANTOM® sensors added section. Sensors may be removed from the group using the Delete option.
Scanning the QR Code
(PC, laptop, tablet, or computer camera required): Click the QR Code Reader button. The code bar reader window opens.
Select the desired camera from the Device dropdown list. Position the QR label in front of the camera – squarely and close enough to be clearly read. The code bar reader window will automatically capture the image, momentarily turn green, and document the sensor when it has read the QR code. It will then close automatically, and the scanned sensor will appear in the “PHANTOM® devices added” section.
Naming and Configuration
The Set PHANTOM® screen allows users to identify PHANTOM® sensors using common nomenclature, for easier identification in Digivibe MX® PHANTOM®.
We can organize your PHANTOM® devices with the following tools:
- With the group box, we can select a previous group name from the list or type a new one to create a group.
- In the name box, we can select a name for our device o to simplify the PHANTOM® identification.
- On the description box, we select what kind of PHANTOM® are we using.
Once you’re finished click next.
Assign Device
In the next window, we find the Assign Channels screen, here we can assign the device to an analysis point in a selected machine from the tree, we can only set one point per channel.
Set the Axis and Alarms
Next, we have the set PHANTOM® alarms window, in here we can set a preset temperature threshold. If the alarm value is exceeded, the sensor will immediately wake and send an unscheduled data collection.
Completing PHANTOM® Configuration
Finally, the Completing PHANTOM® Configuration screen provides an opportunity to add a new PHANTOM® sensor and review the sensor configurations. If corrections need to be made, the previous button can be used. If you’re satisfied with the configuration, click Finish to save all changes and close the wizard. Changes can be abandoned by closing the window or clicking Cancel.
To learn more about our PHANTOM® system please visit the continuous vibration monitoring section.